Posts Tagged ‘RelayPipe’

RelayPipe Tip: Changing The Number Of Posts That Appear On Your Page

Wednesday, January 9th, 2013

For those of you using RelayPipe, there is an ability to regulate how many posts appear on your blog page. The standard display is ten posts, however you may want to shorten this number to accommodate a shorter page template, or to make reading appear easier for your visitors.

Shortening the number of posts that appear on your main blog feed will not reduce the number of articles that you receive; it only reduces the number that are displayed. Additional posts will still be available in your Archive and Category lists, as well as in your 'more posts' link at the bottom of the blog page.

The process is made fairly easy with the following instructions:

1. Open your RelayPipe blog page file (the one where you are storing your RelayPipe Access Code, and that governs your display of posts);

2. Proceed with the following edits. Note that we are working in the area of your file from about line 30 to about 33, as shown in this next image:


3. Assuming you want to change the number of posts to '4', change the zero in line 30 to '4' as shown in the image below:


4. Next, replace the lines that start with 'else' and ends with '$_REQUESTS);' as shown in the image below...


5. ...with the following new lines as depicted in the image below (see files downloads below for written copies):


*NOTE that it is important to make sure the REQUEST and LIMIT variables are the same, and that while I have used '4' as my example, you can make this any number you would like to fit your page. I have circled these in the image below:


The image above shows how this should look in its final edited state in order to limit the page to four posts.

If you want the code for this section in a handy copy-and-paste format, download the 'quick-fix-file'.

If you want the entire edited page of Basic code from our pre-written RelayPipe examples, download the 'edited-basic-file'. Note that this will give you the code for limiting to 4 posts. You can change the number if you like. Also note that you will have to install your RelayPipe Access Code at the top of the file in order for it to work with your account.

Write us in the Support Ticket System in your ListPipe account if you have additional questions.

RelayPipe Explained

Thursday, May 3rd, 2012

RelayPipe™ is our exclusive web service that allows you to receive our content to your dynamic PHP site by adding special code to a page on your site.

NOTE: If you have a WordPress site, we recommend you use our WordPress Plugin, instead; it is a lot easier, and does the same thing.

RelayPipe is a RESTful web service that uses REST to serve Powerful Custom Content™ from ListPipe, via HTTP, so that developers can easily integrate this content into a custom dynamic site. If you are not familiar with REST, visit this page: http://en.wikipedia.org/wiki/Representational_State_Transfer

How RelayPipe Works

RelayPipe creates a handshake between the ListPipe engine and your dynamic website using the REST protocol. Content is stored in your account on the ListPipe system. Your site will display this content by retrieving it from ListPipe and then formatting it to your liking on your site (similar to how your site can display content from a database; although using REST protocol instead of SQL).

We provide example scripts in your account control panel to help illustrate the functionality of RelayPipe and give you a head start on implementing this into your own site. We also have a public RelayPipe Help Center that provides pre-written solutions that you can use to install RelayPipe on your own site.

RelayPipe requires that you have a unique RelayPipe Access Code, which you receive with your account when it is created as a RelayPipe account type. You will need to insert this code into specified areas of the code samples in order for them to work correctly.

It is important not to share your access code or post it where it can be found; the access code is the only level of security to prevent other people from connecting to your account and obtaining your content. Your access code is not your account password. If someone learns your access code, they will not be able to access your ListPipe account, but they will be able to access your RelayPipe data (for the record, your RelayPipe data is the content on your site, which is easily accessed simply by browsing your site, so the security risk is very small).

RelayPipe is designed to be simple. You simply use this URL to send a request to ListPipe, and the RelayPipe will return the requested data as a JSON array. You will open this URL using your programming language of choice and read its contents. For example, when using php, the 'file_get_contents' function is an excellent way to get the contents of the URL and then the 'json_decode' function can be used to convert the contents into an array.

You will also need to add the RelayPipeFunctions.php file to your site. Instructions for implementation are provided at the RelayPipe Help Center.

RelayPipe and Facebook Connections – Solved

Wednesday, February 15th, 2012

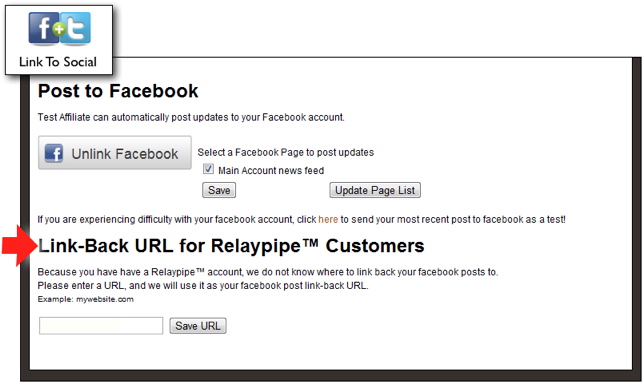
We recently added a new feature to our ListPipe Control Panel for our RelayPipe™ users; the ability to specify the page to which your Facebook posts link.

This has been an often-requested feature from our RelayPipe users because until now we had no way of knowing which specific page to link back to, so we were simply sending all links back to the Home page of the user's website. This caused some confusion, and raised the question about whether we could provide a method for specifying a different page for posts to return to. Yes we can!

RelayPipe users can now enter the Link to Social section of the Control Panel Toolbox and enter the URL to which you would like us to link all your Facebook posts.

RelayPipe users are customers who have elected to have our content published directly to their existing site using a web service. Because RelayPipe allows for a wide range of custom implementations, it is impossible for us to know which page (URL) contains the posts, or even that the customer prefers that we link back to THAT specific page.

With this new feature, RelayPipe users can specify the exact page to link back to from Facebook posts; it can be your Home page, your Blog page, or any other page you specify.

If you are a RelayPipe user, please login to your account and click on the Link to Social button in the middle of the Control Panel Toolbox to get to the new feature. You will find it at the bottom of the page, just below the Facebook Link section.

NOTE: If you are NOT a RelayPipe user, you will not see this new feature.