RelayPipe and Facebook Connections – Solved

February 15th, 2012

We recently added a new feature to our ListPipe Control Panel for our RelayPipe™ users; the ability to specify the page to which your Facebook posts link.

This has been an often-requested feature from our RelayPipe users because until now we had no way of knowing which specific page to link back to, so we were simply sending all links back to the Home page of the user's website. This caused some confusion, and raised the question about whether we could provide a method for specifying a different page for posts to return to. Yes we can!

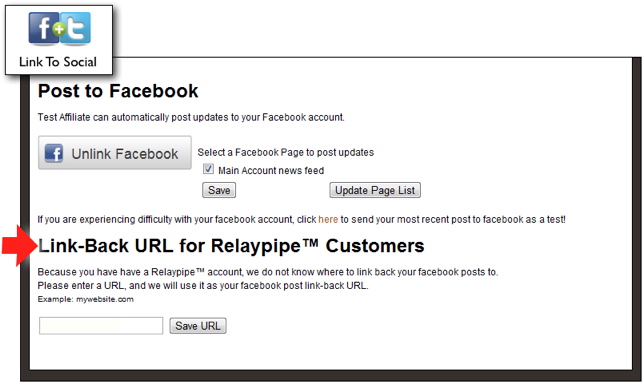
RelayPipe users can now enter the Link to Social section of the Control Panel Toolbox and enter the URL to which you would like us to link all your Facebook posts.

RelayPipe users are customers who have elected to have our content published directly to their existing site using a web service. Because RelayPipe allows for a wide range of custom implementations, it is impossible for us to know which page (URL) contains the posts, or even that the customer prefers that we link back to THAT specific page.

With this new feature, RelayPipe users can specify the exact page to link back to from Facebook posts; it can be your Home page, your Blog page, or any other page you specify.

If you are a RelayPipe user, please login to your account and click on the Link to Social button in the middle of the Control Panel Toolbox to get to the new feature. You will find it at the bottom of the page, just below the Facebook Link section.

NOTE: If you are NOT a RelayPipe user, you will not see this new feature.

Five Easy Things You Can Do To Increase Your Page Rank

February 9th, 2012

5 SEO TipsWe often get questions about how to improve your Page Rank. The truth is that this is a pretty complex question, but there are a few simple things you can do to improve your page rank. We've assembled the five easiest, and free-est items you can add to your list to help improve the rank of your site and raise your visibility in the search engines.

Every time you post a new article on your site, do these five things:

  1. Make Comments On Other Blogs: Seek other blogs that are similar to yours and make genuine, positive comments on their posts. Most often they will let you include a link to your site. These linkbacks are extremely valuable.
  2. Share Your Posts On Twitter. Twitter posts are being indexed by Google, and that means that links to your content are being counted as linkbacks; good stuff!
  3. Share Your Posts On Facebook. Like Twitter, Facebook posts are indexed by Google. Not only do you share your content and linkbacks with your friends and their friends, but you gain additional recognition from Google.
  4. Share Your Posts To StumbleUpon. StumbleUpon is a link sharing site that is recognized as one of the leading sources of visibility. Posting your articles to StumbleUpon is like shouting your news through a bullhorn on a busy street; lots of people will have access, and Google will see your linkback.
  5. Share Your Links On Digg. Digg is a social bookmarking site that has become quite popular. As such, it is a good place to post and share your links for the same reasons stated above. Users of Digg vote for interesting content, so if you gain some recognition there is a chance it will take off and go viral.

There are some wonderful tools you can use to make these simple tasks even easier. On our ListPipe sites we always include the AddToAny tool that allows you to share with a simple click. You'll find this at the bottom of every article.

Managing your Facebook and Twitter accounts are made easy with HootSuite, a free tool that allows you to post from a central location to multiple Facebook and Twitter accounts. Of course this is also made easy in your ListPipe Control Panel, where you can automate the process of posting your content to Facebook and Twitter.

These five steps would take less than five minutes to complete for any given post, and make a good base of tasks for every article.

For more information on what you can do to improve your site rank, and increase your visibility in search results, visit our sister site at Business Blogger Tips.

Forget Your Password?

October 5th, 2011

With more and more people calling in to say 'I forgot my password', we decided it was about time we enabled a lookup password feature on our login page.

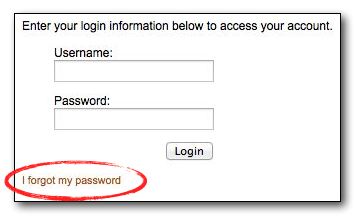
If you have lost your password, simply visit our login page (up there in the top right corner) and locate the new 'I forgot my password' link at the bottom of the login screen. Click the link and enter your username and your password will be emailed to the email address we have on record for that account.

Easy!

ListPipe Testimonial – Google PR After Only Three Weeks

August 25th, 2011

I received the following testimonial via email from Tip Kilby, an Independent Distributor for Enagic, a ListPipe customer...

Subject: Wow! My Google placement after less than 3 weeks on ListPipe

I am the world's biggest skeptic sometimes, but you convinced me to give your ListPipe blog system a fair try. I did.

After only three weeks of using your blog service, when I typed in my Google search for "Tucson Kangen distributor", I placed fifth on Page One! There is only one actual Enagic distributor ahead of me and he is a well-established business in Irvine, CA. (Go figure!) So I am the only actual Tucson distributor listed at the top of Tucson.

And a moment ago, I thought to do a Google search for "Tucson Enagic distributor" and I just discovered my Listpipe site has the TOP TWO positions on page 1!!

Anyone who does either of those searches will definitely end up landing on one of my main Enagic template sites through the generous linking done from my blog site. Neither of my Enagic sites placed anywhere reasonable on Google.

Man, I love you guys!

Thanks Tip; We really appreciate your kind words and wish you even more success!

Adding Google Analytics To Your Account

July 27th, 2011

Many of you have asked how to add your ListPipe blog to your Google Analytics account so that you can track and manage visitation. We have included the Ultimate Google Analytics plugin to your account so that you can easily connect your site to your Google account. The process should take you just a couple minutes if you already have a Google Analytics account.

Here are the steps:

  1. Log into your WordPress site
  2. Go to Plugins (on the left, near center)
  3. Activate the 'Ultimate Google Analytics' plugin
  4. Go to Settings (on the left, near bottom)
  5. Go to 'Ultimage GA' under Settings
  6. Enter your Google UA code and click to Update Options
  7. Your Google account is now connected to your site. Stats will begine to appear after 24 hours.

—Note that this process assumes you already have a Google Analytics account. If not; grab one; they're free and provide a remarkable amount of information about your site.

Connecting To Facebook and Twitter

July 1st, 2011

ListPipe provides an easy way to connect your account to Facebook and Twitter.

Each time we publish an article to your website account, we will also automatically publish a post to your Facebook and/or Twitter account. Each post to these social networks includes a link back to your site. Why is this important?

Connecting to these social networks provides a tremendous advantage for a number of reasons:

  • Search engines are now indexing Facebook and Twitter pages, which means links from these pages are indexed and provide additional SEO juice to your site;
  • Links from social networks are becoming increasingly valuable for driving additional traffic to informational sites;
  • Information posted on your Facebook and Twitter pages are shared to friends of friends, and followers, extending the reach of your message.

Here's a quick introduction to our ListPipe Link application that provides the connection between your website account and your social network accounts. Take a few moments to get to know how it works, then Get Connected!

[quicktime]http://listpipe.com/video/ListPipeLink.mov[/quicktime]

Problems With PHP4

February 11th, 2011

Our ListPipe Content Generator plugin is only compatible with PHP5 and above. This is due to an issue regarding a change in PHP5 to support a command called 'try' that we use in order to create the handshake between your ListPipe account and your external WordPress blog.

If you have experienced a site-wide error when activating our plugin, notably a "syntax error, unexpected { on line 28", then you are likely running PHP4.

Don't worry; we have a solution...

For those of you who may be having trouble, we have created a special PHP4 plugin that bypasses the 'try' command so that you can connect to ListPipe from a PHP4 server.

Download the ListPipe PHP4 Plugin

We do recommend that you upgrade your server to PHP5 instead, but we realize this may not always be practical.

PS: Our ListPipe Content Generator plugin version 2.5 is fully compatible with WordPress version 3.0.5 (we just haven't updated the reference yet).

Adding Video To Your ListPipe Blog

February 1st, 2011

Adding video to your blog is a great way to deliver a message and adds to the entertainment value of your site. The result can be more interest and longer stays.

We encourage you to add video from YouTube.com for several reasons, not the least of which are that you can take advantage of their outstanding video features, ease of use, and access to a global community of You-Tubers who can engage with your videos from computers, phones and tablets.

There are several ways to add a video to your blog. Here is a quick overview of the easier ones:

Quicktags

The easiest way to add video to your blog is via a plugin that we include called Viper's Video Quicktags.

When you log into your blog and create a new post, you will notice a small icon in the editing toolbar for 'YouTube'. Simply place your cursor in your text where you want it to insert, and click the YouTube button.

You will be asked to enter the URL for the video. Click 'OK' and you're finished!

Embed

YouTube provides a handy embed code at the bottom of each of their videos. This embed code is customizable, and allows you to easily embed a video onto your blog.

Just visit your favorite video on YouTube and click the 'Embed' button located under the video. A box will open below the button that includes options for customizing your video including colors, sizes, and the ability to include related videos.

When you are finished selecting your custom options, simply copy the embed code from the box and paste it into the HTML editing window in your blog.

WAIT! You're not finished yet; before you change to the Visual window to continue editing, or save, add paragraph tags to the embed code. This will make the embed code compatible with your WordPress blog and save you the trouble of learning the hard way that WordPress doesn't take kindly to some types of code (for your safety).

Adding paragraph tags is simple; just add one of these to the front of the embed code: '<p>', and one of these to the end of the embed code: '</p>' (do not include the single quotes; those are mine).

Adding these tags is a known workaround to an issue regarding an editor that is included within WordPress called TinyMCE. To learn more about this workaround, visit this WordPress ticket regarding the workaround.

Good luck!

Adding A Blog To Your Site With An iFrame

January 27th, 2011

While not optimal for SEO, sometimes there is a case for adding a blog to a site through an iFrame. Here's a quick look at what it means to create an iFrame on your site, and how to do it:

An iFrame is literally a window-within-a-window on your site. On a page on your site we can create a window that shows the view of a completely different site. In this way you can include the contents from another site on a page of your own site. It is relatively easy to do and offers a solution to showing content on your site that is being hosted on another site.

Many of our ListPipe customers are using an iFrame to show the contents of their hosted blog on their HTML-based Home Page. As an example, take a look at Bay Hundred Automotive, who has created a 'Video' page on their Home site, and are showing their hosted blog through an iFrame. The result is that they can offer the videos to their customers on their own site without having to develop a more complex solution. Their Home site is not running PHP or another dynamic language site, so they were limited in their options for including the content and decided an iFrame would suit their needs.

Notice that they have a static page with a window embedded inside a 'frame'. Inside the frame you can navigate the site, watch videos and click links. An iFrame is the next best thing to having the content actually exist on your site.

The pros of an iFrame are that it is easy to implement, and universally available (independent of your code language). The cons include lower SEO and the drawbacks of having dual navigation. Sometimes the tradeoff makes sense.

Here's how to create an iFrame on your site to include your ListPipe blog:

  1. Create your account on ListPipe as a 'Hosted Blog' account. This will give you an independent blog site.
  2. Create a new page on your Home site for the blog (name it 'Blog' or 'News', etc.)
  3. On the new page, place this line of code: <iframe src="http://*****.com/" width="100%" height="600" style="border:0;"></iframe>
  4. Replace the five asterisks (*****) with the URL of your ListPipe Hosted Blog (replace '.com', too, if you need to)
  5. Save, and load. You should see your ListPipe blog appear within a window on your new page, just as it does on the Bay Hundred Automotive site in our example.

Good Luck!