Archive for the ‘ListPipe Info’ Category

Creating A New Link To Your AutoNetTV Webtools or Service Assistant Site

Friday, April 19th, 2013

One of the questions we receive frequently is 'Do you have a link we can use to connect our home site to our new Webtools/SA site?'

The answer is Yes, and here it is:

The following code samples will allow you to place a pre-created graphic button on any page on your site. You will need to know basic HTML in order to understand and place this code on your site.

Simply copy the code sample of your choice (below) to your favorite text editor and edit the three sections of the code marked with 'ALL_CAPS', and then insert into your page HTML.

There are three sections you need to edit:

  1. YOUR_DESTINATION_URL is the place you need to insert the URL of the page you want to open when someone clicks this button. Typically this is your Webtools or Service Assistant page, or Blog page.
  2. DESTINATION_PAGE_TITLE_GOES_HERE is where you need to insert the title of your destination page. This is for SEO and link identification, so use your shop name or city name in this name. For example, a perfect name here would be 'Johnson's Auto Tips Blog Page for Maintown KY'.
  3. DESTINATION_PAGE_TITLE_GOES_HERE is a second place where you need to insert the title of your destination page, just like the first one. One is used for alternate text in a browser, and the other is for the image tag. They can be the same, but don't have to be.

Code Samples

Sample AutoNetTV ButtonCode Sample 1:
The following code will allow you to insert a 50x29-pixel button on your site that looks like the example on the right. —>

<a href="YOUR_DESTINATION_URL" target="_blank" title="DESTINATION_PAGE_TITLE_GOES_HERE"><img src="http://autonettv.com/linklogos/auto-blog-50x29.png" alt="DESTINATION_PAGE_TITLE_GOES_HERE" align="left" style="margin: 8px;" /></a>


Sample AutoNetTV ButtonCode Sample 2:
The following code will allow you to insert a 100x58-pixel button on your site that looks like the example on the right. —>

<a href="YOUR_DESTINATION_URL" target="_blank" title="DESTINATION_PAGE_TITLE_GOES_HERE"><img src="http://autonettv.com/linklogos/auto-blog-100x58.png" alt="DESTINATION_PAGE_TITLE_GOES_HERE" align="left" style="margin: 8px;" /></a>


Sample AutoNetTV ButtonCode Sample 3:
The following code will allow you to insert a 120x70-pixel button on your site that looks like the example on the right. —>

<a href="YOUR_DESTINATION_URL" target="_blank" title="DESTINATION_PAGE_TITLE_GOES_HERE"><img src="http://autonettv.com/linklogos/auto-blog-120x70.png" alt="DESTINATION_PAGE_TITLE_GOES_HERE" align="left" style="margin: 8px;" /></a>


Sample AutoNetTV ButtonCode Sample 4:
The following code will allow you to insert a 179x104-pixel button on your site that looks like the example on the right. —>

<a href="YOUR_DESTINATION_URL" target="_blank" title="DESTINATION_PAGE_TITLE_GOES_HERE"><img src="http://autonettv.com/linklogos/auto-blog-179x104.png" alt="DESTINATION_PAGE_TITLE_GOES_HERE" align="left" style="margin: 8px;" /></a>


Code Sample 5 - Text Only:
The following code will allow you to insert a text-only link on your site. A text link (<—like that one) can be inserted anywhere on your site, including within a paragraph of text.

<a href="DESTINATION_PAGE_TITLE_GOES_HERE" title="DESTINATION_PAGE_TITLE_GOES_HERE" target="_blank">DESTINATION_PAGE_TITLE_GOES_HERE</a>

 A Few Notes About This HTML

      1. You can change the alignment of your button by changing the work in quotes after 'align' in the code snippets. Typical alignment options include 'left', 'center' and 'right. The images on this page are aligned 'right'.
      2. You will want to make your edits to this code in a PLAIN TEXT editor. If you edit this code in Microsoft Word, you will get additional hidden code that will potentially break its function. Writing code in MS Word is bad practice, and will cause problems. Do not edit your code in Microsoft Word.
      3. Use of the AutoNetTV logo and trademark on your site is granted by AutoNetTV on condition of your subscription to the AutoNetTV service. AutoNetTV retains all rights and privileges to this logo, and reserves all rights to this trademark. AutoNetTV retains the right to require you to remove this logo from your site. ListPipe is not an authorizing agent of AutoNetTV; this information and link code is provided as a service to AutoNetTV, and does not represent any authority on the part of ListPipe to act in the name of AutoNetTV.
      4. back up your stuffFinally; this HTML code is provided as-is with no guarantee or even a half-intended wink of confidence. It worked for us, but we can't say it will work for you, or not break your site, or destroy the entire universe. Our advice: Back up your stuff before you go messing with it.


RelayPipe Tip: Changing The Number Of Posts That Appear On Your Page

Wednesday, January 9th, 2013

For those of you using RelayPipe, there is an ability to regulate how many posts appear on your blog page. The standard display is ten posts, however you may want to shorten this number to accommodate a shorter page template, or to make reading appear easier for your visitors.

Shortening the number of posts that appear on your main blog feed will not reduce the number of articles that you receive; it only reduces the number that are displayed. Additional posts will still be available in your Archive and Category lists, as well as in your 'more posts' link at the bottom of the blog page.

The process is made fairly easy with the following instructions:

1. Open your RelayPipe blog page file (the one where you are storing your RelayPipe Access Code, and that governs your display of posts);

2. Proceed with the following edits. Note that we are working in the area of your file from about line 30 to about 33, as shown in this next image:


3. Assuming you want to change the number of posts to '4', change the zero in line 30 to '4' as shown in the image below:


4. Next, replace the lines that start with 'else' and ends with '$_REQUESTS);' as shown in the image below...


5. ...with the following new lines as depicted in the image below (see files downloads below for written copies):


*NOTE that it is important to make sure the REQUEST and LIMIT variables are the same, and that while I have used '4' as my example, you can make this any number you would like to fit your page. I have circled these in the image below:


The image above shows how this should look in its final edited state in order to limit the page to four posts.

If you want the code for this section in a handy copy-and-paste format, download the 'quick-fix-file'.

If you want the entire edited page of Basic code from our pre-written RelayPipe examples, download the 'edited-basic-file'. Note that this will give you the code for limiting to 4 posts. You can change the number if you like. Also note that you will have to install your RelayPipe Access Code at the top of the file in order for it to work with your account.

Write us in the Support Ticket System in your ListPipe account if you have additional questions.

RelayPipe Explained

Thursday, May 3rd, 2012

RelayPipe™ is our exclusive web service that allows you to receive our content to your dynamic PHP site by adding special code to a page on your site.

NOTE: If you have a WordPress site, we recommend you use our WordPress Plugin, instead; it is a lot easier, and does the same thing.

RelayPipe is a RESTful web service that uses REST to serve Powerful Custom Content™ from ListPipe, via HTTP, so that developers can easily integrate this content into a custom dynamic site. If you are not familiar with REST, visit this page: http://en.wikipedia.org/wiki/Representational_State_Transfer

How RelayPipe Works

RelayPipe creates a handshake between the ListPipe engine and your dynamic website using the REST protocol. Content is stored in your account on the ListPipe system. Your site will display this content by retrieving it from ListPipe and then formatting it to your liking on your site (similar to how your site can display content from a database; although using REST protocol instead of SQL).

We provide example scripts in your account control panel to help illustrate the functionality of RelayPipe and give you a head start on implementing this into your own site. We also have a public RelayPipe Help Center that provides pre-written solutions that you can use to install RelayPipe on your own site.

RelayPipe requires that you have a unique RelayPipe Access Code, which you receive with your account when it is created as a RelayPipe account type. You will need to insert this code into specified areas of the code samples in order for them to work correctly.

It is important not to share your access code or post it where it can be found; the access code is the only level of security to prevent other people from connecting to your account and obtaining your content. Your access code is not your account password. If someone learns your access code, they will not be able to access your ListPipe account, but they will be able to access your RelayPipe data (for the record, your RelayPipe data is the content on your site, which is easily accessed simply by browsing your site, so the security risk is very small).

RelayPipe is designed to be simple. You simply use this URL to send a request to ListPipe, and the RelayPipe will return the requested data as a JSON array. You will open this URL using your programming language of choice and read its contents. For example, when using php, the 'file_get_contents' function is an excellent way to get the contents of the URL and then the 'json_decode' function can be used to convert the contents into an array.

You will also need to add the RelayPipeFunctions.php file to your site. Instructions for implementation are provided at the RelayPipe Help Center.

WordPress Plugin: ListPipe Content Generator

Tuesday, March 20th, 2012

Download our WordPress Plugin.

We get a lot of questions regarding our WordPress plugin. Mostly 'Where can I get it?', but there are a few other questions I would like to address in this quick post. For the record, the WordPress plugin is officially called the ListPipe Content Generator.

First, it is important to know that we recommend you install the plugin BEFORE you create your account.

The reason we want you to have the plugin installed and activated before you start your account is because we will attempt to push your initial content as part of the account creation process. If you do not have the plugin installed, the push will fail and you will not receive your first article(s).

This is not necessarily a huge problem; you will begin to receive content from our service within a week of installing and activating the plugin, but if you can get it done before you create your account you will receive content within the first hour.

Where Can I Get It?

There are three ways you can get the WordPress Plugin:

  1. The easiest place to get the plugin is within your own WordPress installation. Simply go to the 'Plugins' section of your WordPress Dashboard (on the left, about in the middle) and click 'Add New'. Perform a search for 'ListPipe Content Generator' to find the plugin, and then Install and Activate the plugin. Easy. Note that this only works for sites that have automation turned on, which most do.
  2. You can always download the ListPipe Content Generator plugin directly from WordPress.org, where our plugin resides and is made available to all WordPress users. To download from WordPress, go to: http://wordpress.org/extend/plugins/listpipe/ . Once you have downloaded the plugin, copy it to your Plugins folder in your site files (typically in root/wp-content/plugins - you will need an FTP client to do this) and then login to your WordPress site and visit your Plugins section to Activate the plugin.
  3. The ListPipe Content Generator plugin is available in your Account Home Toolbox (Control Panel). The problem with getting it from here is that it requires you to have an account, and we recommend that you install the plugin before you create your account. The reason we put it in the Toolbox is so that you have ready access to it if you should ever need it in the future when revising your site or for updates.

When Should I Install The WordPress Plugin?

As already addressed; we recommend installing and activating the plugin BEFORE you start your account.

The reason for this is that at the end of the sign up process we will attempt to deliver your first article. If the plugin is not installed and activated, we will not be able to deliver your initial content.

If you miss your initial content (we call it 'Startup Content'), you have two choices: You can simply install and activate the plugin and wait for your next week's content to arrive (should be there in the next week), or you can create a Support Ticket and ask that we push your Startup Content again.

Make sure that you have installed and activated the ListPipe Content Generator plugin on your site before you ask us to re-push your Startup Content.

What Does The Plugin Do?

The ListPipe Content Generator receives content from our service in a secure 'handshake' that lasts only a couple seconds.

The plugin basically acts as a 'catcher', just like a catcher in baseball; It simply waits for a pitch, and only responds when it is called. It doesn't initiate any of it's own processes; it only responds when called. It simply waits for our server to contact it and receives the new content in a secure 'handshake'.

During the secure 'handshake', our server communicates with your plugin and confirms your identity using a very secure and private random 'key'. The key is only good for a couple of seconds, and expires as soon as the transaction is complete. Once your identity is confirmed, our server delivers the content to your site with the permission of the plugin, and then the 'handshake' is closed. The plugin then simply waits for another call from our service. The plugin cannot receive a call from any other service because it uses a proprietary private key to establish the handshake.

Do I Have To Configure The Plugin?

No, You do not have to configure the plugin. There are no passwords to enter, and no settings to adjust; we do everything from within your account settings on our server. The plugin simply listens for a call, and uses your own URL to help us make a positive identification.

How Do I Remove The Plugin

If you should end the service with us, simply delete the plugin from your Plugins folder (typically in root/wp-content/plugins - you will need an FTP client to do this). That's all. You can also delete the plugin from within your WordPress Dashboard by going to Plugins and deactivating and then deleting the ListPipe Content Generator plugin. There is nothing more to do than this; deleting the plugin fully removes it from your system.

Why Did My Videos Stop Working?

Friday, March 9th, 2012

A Broken Video Window

We have received a few calls asking why videos seem to stop working.

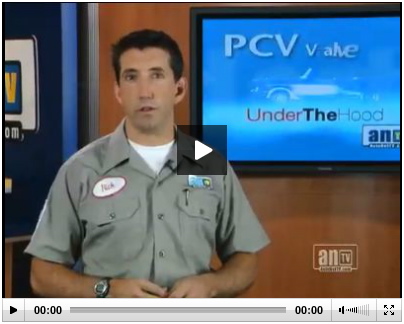
For a few of our customers, the video portion of their content has been mysteriously replaced by a large black rectangle that won't display any video. The example to the right is what you might see on your site if your videos seem to have flown the coop.

If you have this issue, you might have noticed this after the content has been edited in some way, even though the video itself hasn't been modified. It might have occurred after you copied the content, and then re-pasted it exactly as it was with no modifications.

Why did your videos stop working?

The answer has to do with 'how' you edited or copied your content.

In your WordPress Editing Window you will notice two tabs on the top right corner of the editing window; one labeled 'Visual' and the other labeled 'HTML'.

Editing Window Showing Tabs At Upper Right

These are very important, and here is why; we publish your video content in an 'HTML wrapper', meaning that in your content you have a paragraph of HTML 'code' that includes instructions on where your browser can find the video file, and where to connect to a video player. This code is only available to you in the HTML tab, and is 'invisible' to you in the Visual tab.

When you move, copy or paste content from your site using the Visual Tab, you are copying a 'display only' version of the content, which does not include the HTML code for the video. If you paste the Visual content into another site, or onto another page, or in another applications such as a word processor, you are saving a copy of your content without the video code. When you paste it back, the video will be broken.

Video Code Example

While it seems you have not 'touched' the video portion of your site, in effect you have actually removed it by doing a copy and past.

The Solution

To solve this problem, make your edits in the HTML tab, or copy from the HTML tab to make sure you are getting all the video information. Small edits to your text can be safely performed in the Visual tab, however there are some cases where you may overwrite your video code without realizing it. For this reason we recommend editing in or copying from in the HTML tab, only.

A Functional Video Window

Editing in the HTML tab is really no different than editing in the Visual tab, but allows you to clearly see where the code elements are so you can avoid them or include them as you need to. Safely editing in the HTML tab will preserve your video and save you additional trouble.

NOTE: You should never have to make edits to the video code in any of your posts. Editing your video code (usually at the top of the post) is risky if you are unfamiliar with HTML, and can result in you losing access to the video in your post. Also, watch out for image code within your article, and avoid editing anything that has special characters or appears to be a code reference.

If you have missing videos on your site that you need help with, please create a new support ticket with a request for help with broken video.

Good luck!


Local Search Marketing Works

Tuesday, March 6th, 2012

ListPipe specializes in local search marketing with Powerful Custom Content written just for you.

I ran across a couple of very interesting statistics that indicate local search is not only gaining ground, but is a valuable method for marketing your business online.

  • Over 80%* of local searches are done online
  • Over 50%** of local searches result in a purchase
  • Millions use local search everyday

*Google   **eMarketer - October, 2009

Five Easy Things You Can Do To Increase Your Page Rank

Thursday, February 9th, 2012

5 SEO TipsWe often get questions about how to improve your Page Rank. The truth is that this is a pretty complex question, but there are a few simple things you can do to improve your page rank. We've assembled the five easiest, and free-est items you can add to your list to help improve the rank of your site and raise your visibility in the search engines.

Every time you post a new article on your site, do these five things:

  1. Make Comments On Other Blogs: Seek other blogs that are similar to yours and make genuine, positive comments on their posts. Most often they will let you include a link to your site. These linkbacks are extremely valuable.
  2. Share Your Posts On Twitter. Twitter posts are being indexed by Google, and that means that links to your content are being counted as linkbacks; good stuff!
  3. Share Your Posts On Facebook. Like Twitter, Facebook posts are indexed by Google. Not only do you share your content and linkbacks with your friends and their friends, but you gain additional recognition from Google.
  4. Share Your Posts To StumbleUpon. StumbleUpon is a link sharing site that is recognized as one of the leading sources of visibility. Posting your articles to StumbleUpon is like shouting your news through a bullhorn on a busy street; lots of people will have access, and Google will see your linkback.
  5. Share Your Links On Digg. Digg is a social bookmarking site that has become quite popular. As such, it is a good place to post and share your links for the same reasons stated above. Users of Digg vote for interesting content, so if you gain some recognition there is a chance it will take off and go viral.

There are some wonderful tools you can use to make these simple tasks even easier. On our ListPipe sites we always include the AddToAny tool that allows you to share with a simple click. You'll find this at the bottom of every article.

Managing your Facebook and Twitter accounts are made easy with HootSuite, a free tool that allows you to post from a central location to multiple Facebook and Twitter accounts. Of course this is also made easy in your ListPipe Control Panel, where you can automate the process of posting your content to Facebook and Twitter.

These five steps would take less than five minutes to complete for any given post, and make a good base of tasks for every article.

For more information on what you can do to improve your site rank, and increase your visibility in search results, visit our sister site at Business Blogger Tips.

Forget Your Password?

Wednesday, October 5th, 2011

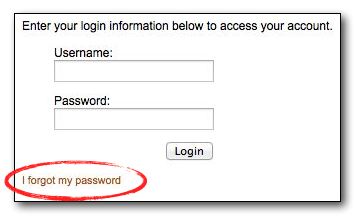
With more and more people calling in to say 'I forgot my password', we decided it was about time we enabled a lookup password feature on our login page.

If you have lost your password, simply visit our login page (up there in the top right corner) and locate the new 'I forgot my password' link at the bottom of the login screen. Click the link and enter your username and your password will be emailed to the email address we have on record for that account.

Easy!

Adding Google Analytics To Your Account

Wednesday, July 27th, 2011

Many of you have asked how to add your ListPipe blog to your Google Analytics account so that you can track and manage visitation. We have included the Ultimate Google Analytics plugin to your account so that you can easily connect your site to your Google account. The process should take you just a couple minutes if you already have a Google Analytics account.

Here are the steps:

  1. Log into your WordPress site
  2. Go to Plugins (on the left, near center)
  3. Activate the 'Ultimate Google Analytics' plugin
  4. Go to Settings (on the left, near bottom)
  5. Go to 'Ultimage GA' under Settings
  6. Enter your Google UA code and click to Update Options
  7. Your Google account is now connected to your site. Stats will begine to appear after 24 hours.

—Note that this process assumes you already have a Google Analytics account. If not; grab one; they're free and provide a remarkable amount of information about your site.

Connecting To Facebook and Twitter

Friday, July 1st, 2011

ListPipe provides an easy way to connect your account to Facebook and Twitter.

Each time we publish an article to your website account, we will also automatically publish a post to your Facebook and/or Twitter account. Each post to these social networks includes a link back to your site. Why is this important?

Connecting to these social networks provides a tremendous advantage for a number of reasons:

  • Search engines are now indexing Facebook and Twitter pages, which means links from these pages are indexed and provide additional SEO juice to your site;
  • Links from social networks are becoming increasingly valuable for driving additional traffic to informational sites;
  • Information posted on your Facebook and Twitter pages are shared to friends of friends, and followers, extending the reach of your message.

Here's a quick introduction to our ListPipe Link application that provides the connection between your website account and your social network accounts. Take a few moments to get to know how it works, then Get Connected!

[quicktime]http://listpipe.com/video/ListPipeLink.mov[/quicktime]